Drip Irrigation Concepts and Suggestions
1 Basic Concepts
-
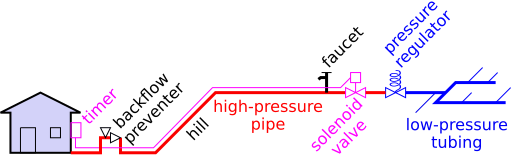
Backflow Preventer aka Siphon Breaker:
You ought to install a backflow preventer, in the same sense that you
ought to wear a seat belt while driving. You hope not to need it, but
by the time you realize you absolutely do need it, it’s too late to go
looking for one.
It’s designed to make sure mud and manure cannot possibly get sucked
into the drinking water system, even if the system pressure goes to
zero. Everything in your house is already either air-gapped (e.g.
sinks) or equipped with a backflow valve (e.g. toilet tanks).
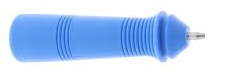
The device should be installed upstream of any place where a hose or
irrigation line could be connected. The simplest kind attaches to an
existing faucet aka hose bib aka sillcock, as shown in figure 1. It has to be installed reasonably high up,
because if the device is submerged in a puddle, then puddle water will
get sucked in, which defeats the purpose.
 Figure 1
: Simple Cheap Backflow Preventer
In some jurisdictions, but not all, irrigation systems (and maybe even
plain old garden faucets) are required to have backflow preventers. Do
not assume you already have them. They are complicated things. They
have vents. If there is one attached to your faucet, you will be able
to see it. If you don’t see it, it’s not there.
The ones that attach to a faucet typically come with a setscrew to
lock them in place. The setscrew might be meant to break off, to
create a permanent installation, but that’s not what you want. It’s
better to discard the breakable setscrew and use an ordinary
non-breakable one instead, as discussed here.
-
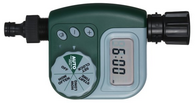
Controller aka Timer: Although in
principle you could just turn the irrigation system on and off by
hand, whenever you feel like it, in practice if you have an irrigation
system you might as well put a timer on it.
You can get simple ones, e.g. as shown in figure 2. They say they are for outdoor use
only, but you should protect them from exposure to sunlight, rain, and
freezing temperatures. They run on batteries that “should” last an
entire season.
Do not apply cheap timers to anything except a low-flow drip-irrigation system. They shut off abruptly, which could cause water hammer which could cause the incoming water line to explode.
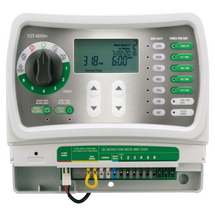
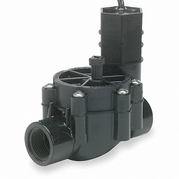
A fancier system will have a multi-zone controller in some convenient
sheltered location, connected by wires to valves in some other
locations(s). The good controllers are highly capable without being
confusing or overcomplicated. The valves shut off gradually, as they
should.
-
Full-Pressure Pipes: You don’t need to convert
to low pressure at the first opportunity. In fact, you get better
performance if you run high pressure as far as you conveniently can,
then regulate down, as discussed in section 2.
-
Pressure Regulation: Drip irrigation
components are designed to work at 25 psi. Beware that the stores also
carry 10 psi regulators, which are not what you want.
Beware that pressure change due to topographic height has to be
accounted for. This could easily be larger than the viscous drop,
unless the terrain is fairly flat. Each vertical foot is half a psi.
The easy way to deal with this (and numerous other issues as well)
is discussed in section 2.
-
Low-Pressure Distribution Tubing: The outside
diameter (OD) for distribution tubing is 0.700 or 0.710 (depending on
brand), which is what matters for the connectors. The ID is somewhere
between 0.500 (heavy duty) and 0.610 (light duty), which is what
matters when estimating the flow impedance. Minimum bend radius is
about 3 feet.
Some connectors work on 0.710 tubing (blue stripe), some work on 0.700
tubing (no stripe), and some are “universal”. Beware. It’s best to
pick one family (either .720 or .700) and stick with it.
This stuff is sometimes called half-inch tubing or 5/8 tubing, for no
particularly good reason.
-
Hookup tubing: The OD for hookup tubing is about
0.250, which hardly matters. The ID is about 0.170, which matters both
for connections (internal barbs) and for impedance. Minimum bend
radius is a couple of inches.
-
Pressure Drop: Flow impedance scales like the
fourth power of the ID (Poiseuille equation). So one foot of hookup
tubing is comparable to 75 feet (or more) of distribution tubing. This
explains why it is standard practice to use distribution tubing for
the long haul to get into the general vicinity and then use hookup
tubing with discrete emitters to serve the individual plants. Unless
the number of emitters is huge the viscous pressure drop shouldn’t be
too much of a problem.
-
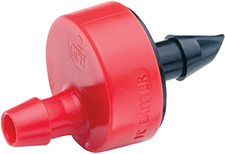
Emitters: Discrete emitter units work just
fine. They are color-coded as follows:
| blue | ½ gph |
| black | 1 gph |
| red | 2 gph |
| tan | 5 gph |
They also make adjustable emitters. There’s a knob you can twist to
adjust the flow rate.
-
Punch: You will need a tool for punching holes
in the 0.7?0 distribution tubing. The cheap ones work well enough,
assuming you’re not making a career of this. If it gets dull,
you can easily sharpen it with a whetstone.
-
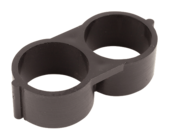
Termination: To close the end of the
distribution line, you can just bend it over to form a sharp kink, and
lock the kink in place using baling wire. Alternatively, you can use a
store-bought figure-8 termination as shown in figure 7. It is slightly easier to remove
than baling wire. Both figure-8s and baling wire are quicker, cheaper,
and more easily removable than the fancy end caps they sell.
-
Prototyping: Start by laying out the whole
system on top of the ground. Use it for a while. Check for leaks and
check the performance before burying it.
-
Winterization: The tubing is more brittle
than it looks. If the tube is full of water and it freezes, the tube
is likely to split.
If you bury the tubing, you don’t need to worry about freezing. Around
here it doesn’t get very cold for very long.
You can achieve much better protection by using 25 PSI air to blast
the water out of the system before freezing temperatures arrive. This
is easier said than done, because it’s hard to get a suitable source
of high-pressure high-volume airflow.
-
Hindrances: Avoid the things mentioned in
section 3.
2 Fancier Setup
You might consider running 1/2" or 3/4" diameter schedule 40 PVC pipe out
to the garden area. Schedule 40 (unlike irrigation tubing) can handle
the full pressure of city water. Then you can install a faucet out in
the garden, so you can hand-water with a plain old garden hose
whenever you want. Also install an automatic valve and a pressure
regulator out in the garden and hook the drip emitters to
that.
This scheme makes a whole bunch of potential problems go away. In
particular, topographic and/or viscous pressure issues upstream of the
regulator do not matter, because they get annihilated by the
regulator.
The point of putting the control valve out in the garden (rather than
near the house) is to allow you to have a faucet in the garden that is
independent of the drip irrigation timer. (You don’t want the faucet
to turn off when the timer is off.)
Install wiring for the automatic valve at the same time you install
the PVC pipe, in the same trench. (I suppose you could avoid the need
for wiring by using a self-contained battery-powered timer, but I
don’t recommend this.)
3 Things to Avoid
3.1 Emitter line
There exists something called emitter line. It looks like 1/4
inch hookup tubing, but it has tiny perforations all along its length.
In theory, this lets water come out, with no need for discrete
emitters. In practice, the tiny holes quickly get blocked with scale.
The water around here is full of not-very-soluble salts, and once the
scale forms it is impossible to get rid of.
I stopped buying emitter line years ago. I didn’t bother to rip it out
the old emitter line; I just let it get plugged with scale. Now
discrete emitters wherever I want the water to come out.
3.2 Filter
A filter in irrigation system seems silly to me. I’ve seen plans
that call for that, but it’s not needed. It’s just an added expense,
plus the hassle of cleaning the filter. Small particles will go
through the regulator and through the discrete emitters just fine.
Conversely, emitter line gets plugged whether or not you have a
filter, as discussed in section 3.1.